Набор значений в ячейке excel. Набор значений, которые могут быть введены в ячейку Excel, ограничен: решение проблемы. G. Поиск ячеек с Проверкой данных
Читайте также
В любых программных продуктах, будь то windows-приложение или web-сайт, получение информации от пользователей зачастую осуществляется с помощью форм ввода данных.
Конечно же, нельзя быть абсолютно уверенным, что пользователь введёт именно то, что нужно, поэтому все данные необходимо тщательно проверить.
Как правило, алгоритм проверки этих данных один и тот же: «Если значение поля удовлетворяет требованию, то проверить следующее требование, иначе вывести сообщение об ошибке. Перейти к проверке значения следующего поля».
На практике это выливается с довольно длинные последовательности «if-else». Лично мне это жутко не нравилось, так как сложно с первого взгляда определить, какие поля как проверяются и какие сообщения выдаются в случае ошибок. А ведь полей в форме может быть и десять, тогда код проверки вообще затягивается. Вобщем, я задумался над тем, как можно минимизировать объём работ и вот что из этого получилось.
Я представил проверку как преобразование значения одного типа в значение другого типа (например, проверка того, что в поле введено чило, это преобразование строки в число). Тоесть проверка - это некая функция, имеющая сигнатуру делегата System.Converter.
Для проверки значение помещаем в класс обёртку:
public class ValidationStep{
public T Value { get ; set ; }
}
Суть проверки заключается в последовательном вызове методов-расширений для объектов класса ValidationStep, которые опять же возращают объект класса ValidationStep. Это позволяет создавать цепочки проверок. Вот пример таких методов-расширений:
public static class ValidationExtensions{
Validate(this T value )
{
return new ValidationStep { Value = value };
}
public static ValidationStep Validate(this ValidationStep step,
Predicate predicate, string message)
{
if (predicate(step.Value)) return step;
throw new ValidationException(message);
}
public static ValidationStep Convert(this ValidationStep step,
Converter converter, string message)
{
try { return converter(step.Value).Validate(); }
catch { throw new ValidationException(message); }
}
}
Первый метод используется, чтобы можно было проверять объекты любых типов, торой метод осуществляет проверку на соответствие предикату, а третий на возможность преобразования значения из одного типа в другой. Также можно написать любые другие проверки, например на соответствие целого числа диапазону. Главное, что в случае неудачной проверки должно возникать исключение ValidationException, которое содержит сообщение с текстом ошибки.
Для осуществления самой проверки можно использовать следующий класс, который будет заниматься перехватом исключений:
public static class Validation{
public static bool Validate(T value , Converter validator,
Action onSuccess, Action onFailure)
{
try
{
var result = validator(value );
onSuccess(result);
return true ;
}
catch (ValidationException e)
{
onFailure(e);
return false ;
}
}
}
А теперь о том, как это использовать. Допустим нам нужно проверить текстовое поле (tb1) и убедиться, что в него введено целое число в диапазоне от 0 до 10. Это можно сделать так:
Validation.Validate(tb1.Text, value => value.Validate()
.Validate(x => x.Length > 0, "Введите что-нибудь" )
.Convert (x => Convert .ToInt32(x), "Введёное значение не является целым числом" )
.Validate(x => x >= 0, "Число не должно быть меньше нуля" )
.Validate(x => x MessageBox.Show("Введено корректное значение: " + v.Value),
e => MessageBox.Show(e.Message));
Учитывая, что проверок может быть больше, да и число полей в форме, как правило, больше одного, такой способ проверок может быть очень даже удобен.
Ну вот, собственно, и всё: о)
Чтобы упростить работу пользователей с листом, добавьте в ячейки раскрывающиеся списки. Раскрывающиеся списки позволяют пользователям выбирать элементы из созданного вами списка.
ВидеоНа новом листе введите данные, которые должны отображаться в раскрывающемся списке. Желательно, чтобы элементы списка содержались в таблице Excel . Если это не так, список можно быстро преобразовать в таблицу, выделив любую ячейку диапазона и нажав клавиши CTRL+T .

Примечания:
Выделите на листе ячейку, в которую требуется поместить раскрывающийся список.
На ленте откройте вкладку Данные и нажмите кнопку Проверка данных .
Примечание: Если кнопка Проверка данных недоступна, возможно, лист защищен или является общим. Разблокируйте определенные области защищенной книги или отмените общий доступ к листу, а затем повторите шаг 3.
На вкладке Параметры в поле Тип данных выберите пункт Список .
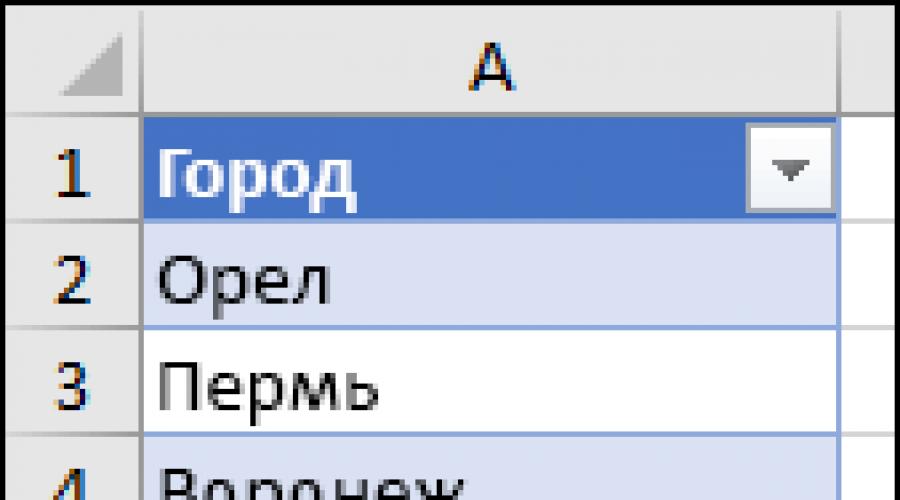
Щелкните поле Источник и выделите диапазон списка. В примере данные находятся на листе "Города" в диапазоне A2:A9. Обратите внимание на то, что строка заголовков отсутствует в диапазоне, так как она не является одним из вариантов, доступных для выбора.

Если можно оставить ячейку пустой, установите флажок Игнорировать пустые ячейки .
Установите флажок Список допустимых значений
Откройте вкладку Подсказка по вводу .

Откройте вкладку Сообщение об ошибке .

Не знаете, какой параметр выбрать в поле Вид ?
Работа с раскрывающимся списком
изменяется ли ширина столбцов и высота строк при отображении всех ваших записей.
Скачивание примеров
Предлагаем скачать образец книги с несколькими примерами проверки данных, аналогичными примеру в этой статье. Вы можете воспользоваться ими или создать собственные сценарии проверки данных. Скачать примеры проверки данных Excel .
Ввод данных станет быстрее и точнее, если ограничить значения в ячейке вариантами из раскрывающегося списка.

Сначала создайте на листе список допустимых элементов, а затем выполните сортировку или расположите их в нужном порядке. В дальнейшем эти элементы могут служить источником для раскрывающегося списка данных. Если список небольшой, на него можно легко ссылаться и вводить элементы прямо в средстве проверки данных.
См. такжеПосле создания раскрывающегося списка убедитесь, что он работает правильно. Например, рекомендуется проверить,
Excel for Office 365 Excel for Office 365 for Mac Excel for the web Excel 2019 Excel 2016 Excel 2019 for Mac Excel 2013 Excel 2010 Excel 2007 Excel 2016 for Mac Excel for Mac 2011 Excel Starter 2010 More... Less
You can use data validation to restrict the type of data or the values that users enter into a cell. One of the most common data validation uses is to create a drop-down list .
If you"re creating a sheet that requires users to enter data, you might want to restrict entry to a certain range of dates or numbers, or make sure that only positive whole numbers are entered. Excel can restrict data entry to certain cells by using data validation, prompt users to enter valid data when a cell is selected, and display an error message when a user enters invalid data.
Restrict data entrySelect the cells where you want to restrict data entry.
On the Data tab, click Data Validation > Data Validation .
Note: Protect a workbook .
In the Allow box, select the type of data you want to allow, and fill in the limiting criteria and values.
Note: The boxes where you enter limiting values will be labeled based on the data and limiting criteria that you have chosen. For example, if you choose Date as your data type, you will be able to enter limiting values in minimum and maximum value boxes labeled Start Date and End Date .
Select the cells where you want to prompt users for valid data entries.
On the Data tab, click Data Validation > Data Validation .
Note: If the validation command is unavailable, the sheet might be protected or the workbook might be shared. You cannot change data validation settings if your workbook is shared or your sheet is protected. For more information about workbook protection, see Protect a workbook .
On the Input Message tab, select the Show input message when cell is selected check box.
In the Title
In the Input message box, type the message that you want to display.
Select the cells where you want to display your error message.
On the Data tab, click Data Validation > Data Validation .
Note: If the validation command is unavailable, the sheet might be protected or the workbook might be shared. You cannot change data validation settings if your workbook is shared or your sheet is protected. For more information about workbook protection, see Protect a workbook .
On the Error Alert tab, in the Title box, type a title for your message.
In the Error message box, type the message that you want to display if invalid data is entered.
Do one of the following:
|
Require users to fix the error before proceeding |
|
|
Warn users that data is invalid, and require them to select Yes or No to indicate if they want to continue |
|
|
Warn users that data is invalid, but allow them to proceed after dismissing the warning message |
Important |
 Prompt users for valid entries
When users click in a cell that has data entry requirements, you can display a message that explains what data is valid.
Display an error message when invalid data is entered
If you have data restrictions in place and a user enters invalid data into a cell, you can display a message that explains the error.
Add data validation to a cell or a range
Note: The first two steps in this section are for adding any type of data validation. Steps 3-7 are specifically for creating a drop-down list.
Select one or more cells to validate.
On the Data tab, in the Data Tools group, click Data Validation .
On the Settings tab, in the Allow box, select List .
In the Source box, type your list values, separated by commas. For example, type Low,Average,High .
Make sure that the In-cell dropdown check box is selected. Otherwise, you won"t be able to see the drop-down arrow next to the cell.
To specify how you want to handle blank (null) values, select or clear the Ignore blank check box.
Test the data validation to make sure that it is working correctly. Try entering both valid and invalid data in the cells to make sure that your settings are working as you intended and your messages are appearing when you expect.
After you create your drop-down list, make sure it works the way you want. For example, you might want to check to see if the cell is wide enough to show all your entries.
Remove data validation - Select the cell or cells that contain the validation you want to delete, then go to Data > Data Validation and in the data validation dialog press the Clear All button, then click OK .
Adding other types of data validation
The following table lists other types of data validation and shows you ways to add it to your worksheets.
|
Restrict data entry to whole numbers within limits. |
Follow steps 1-2 above. From the Allow list, select Whole number . In the Data box, select the type of restriction that you want. For example, to set upper and lower limits, select between . Enter the minimum, maximum, or specific value to allow. You can also enter a formula that returns a number value. For example, say you"re validating data in cell F1. To set a minimum limit of deductions to two times the number of children in that cell, select greater than or equal to in the Data box and enter the formula, =2*F1 , in the Minimum box. |
|
Restrict data entry to a decimal number within limits. |
|
|
Restrict data entry to a date within range of dates. |
Follow steps 1-2 above. In the Allow box, select Date . In the Data box, select the type of restriction that you want. For example, to allow dates after a certain day, select greater than . Enter the start, end, or specific date to allow. You can also enter a formula that returns a date. For example, to set a time frame between today"s date and 3 days from today"s date, select between in the Data box, enter =TODAY() in the Start date box, and enter =TODAY()+3 in the End date box. |
|
Restrict data entry to a time within a time frame. |
Follow steps 1-2 above. In the Allow box, select Time . In the Data box, select the type of restriction that you want. For example, to allow times before a certain time of day, select less than . Enter the start, end, or specific time to allow. If you want to enter specific times, use the hh:mm time format. For example, say you have cell E2 set up with a start time (8:00 AM), and cell F2 with an end time (5:00 PM), and you want to limit meeting times between those times then select between in the Data box, enter =E2 in the Start time box, and then enter =F2 in the End time box. |
|
Restrict data entry to text of a specified length. |
Follow steps 1-2 above. In the Allow box, select Text Length . In the Data box, select the type of restriction that you want. For example, to allow up to a certain number of characters, select less than or equal to . In this case we want to limit entry to 25 characters, so select less than or equal to in the Data box and enter 25 in the Maximum box. |
|
Calculate what is allowed based on the content of another cell. |
Follow steps 1-2 above. In the Allow box, select the type of data that you want. In the Data box, select the type of restriction that you want. In the box or boxes below the Data box, click the cell that you want to use to specify what is allowed. For example, to allow entries for an account only if the result won"t go over the budget in cell E1, select Allow >Whole number, Data , less than or equal to, and Maximum >= =E1 . |
Examples of formulas in data validation
|
The cell that contains a product ID (C2) always begins with the standard prefix of "ID-" and is at least 10 (greater than 9) characters long. |
=AND(LEFT(C2,3)="ID-",LEN(C2)>9)  |
|
The cell that contains a product name (D2) only contains text. |
=ISTEXT(D2)  |
|
The cell that contains someone"s birthday (B6) has to be greater than the number of years set in cell B4. |
=IF(B6 |